All Classes Page
The “All Classes” page is the main hub & home page of Portal, it allows you to create, view and edit classes. Classes are designed to enable Instructor led collections to administer training to Trainees, assign content to users, and more. Without any classes assigned to a user, when they log in to the application, they will not be able to access any content. To manage your classes, navigate to the “Classes” page using the sidebar.
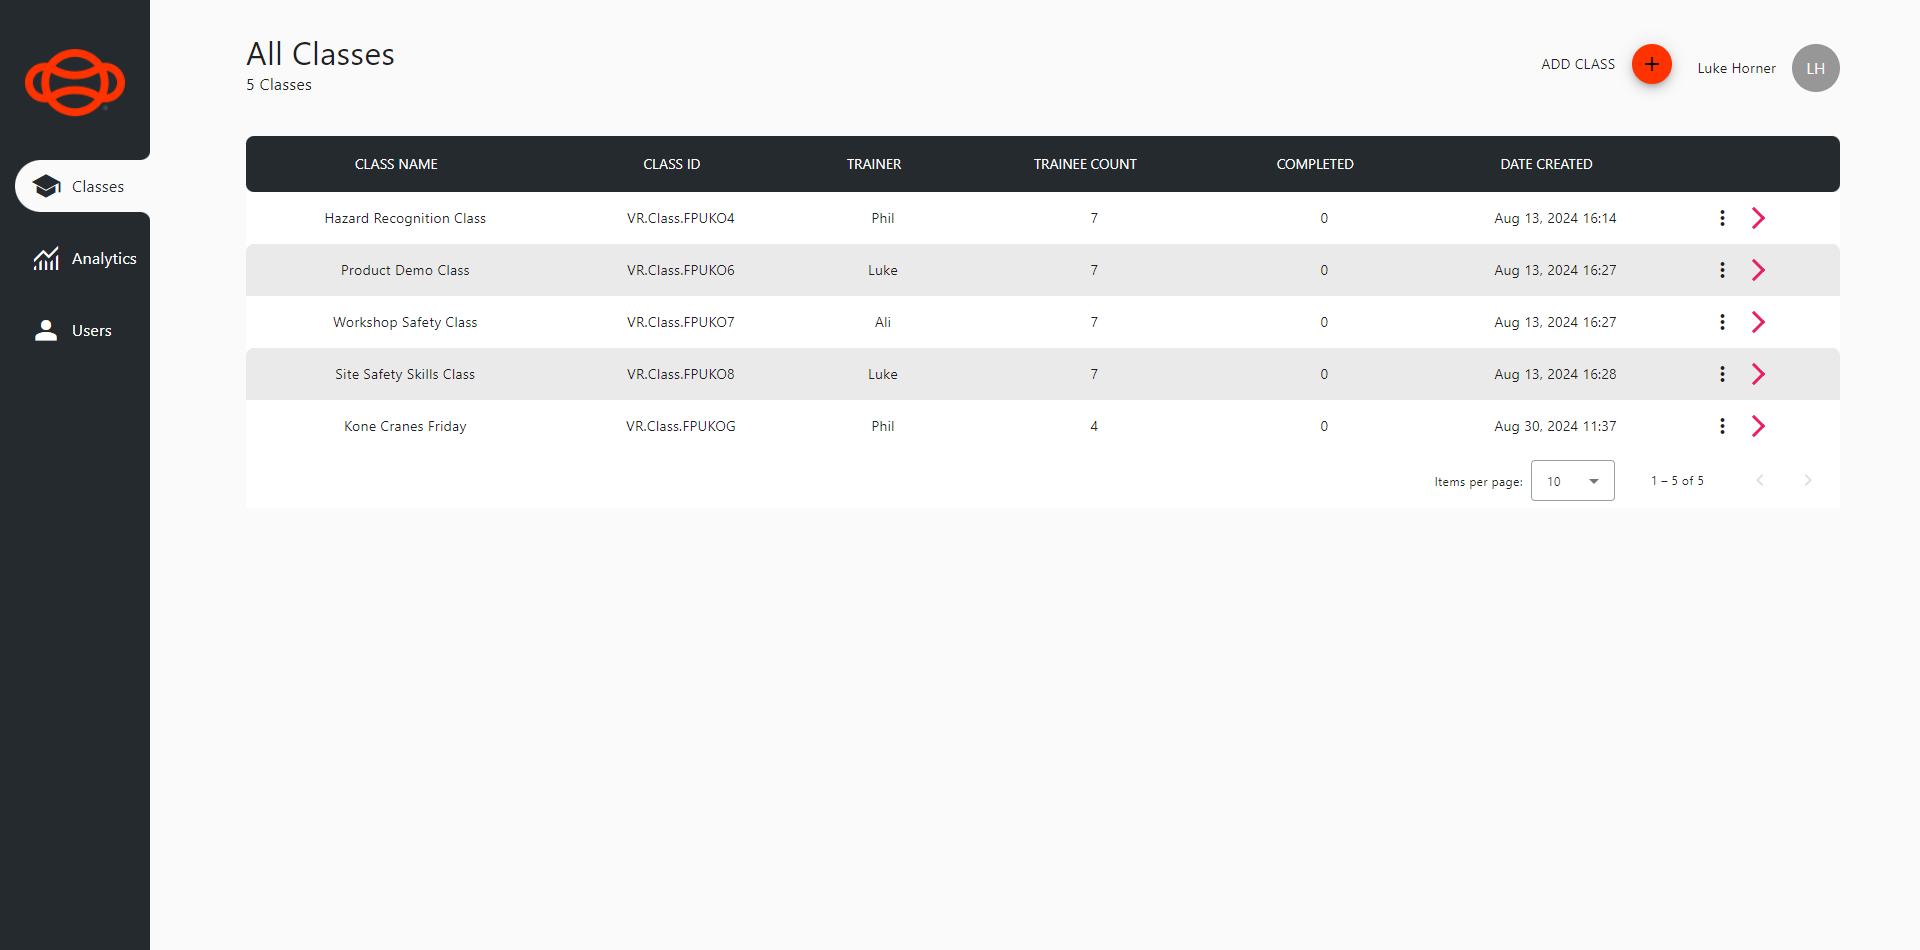
“All Classes” Page with Classes
Creating a Class
To start training, you need to first create a class, which can be done by selecting the “Add Class” button in the top right of the screen.
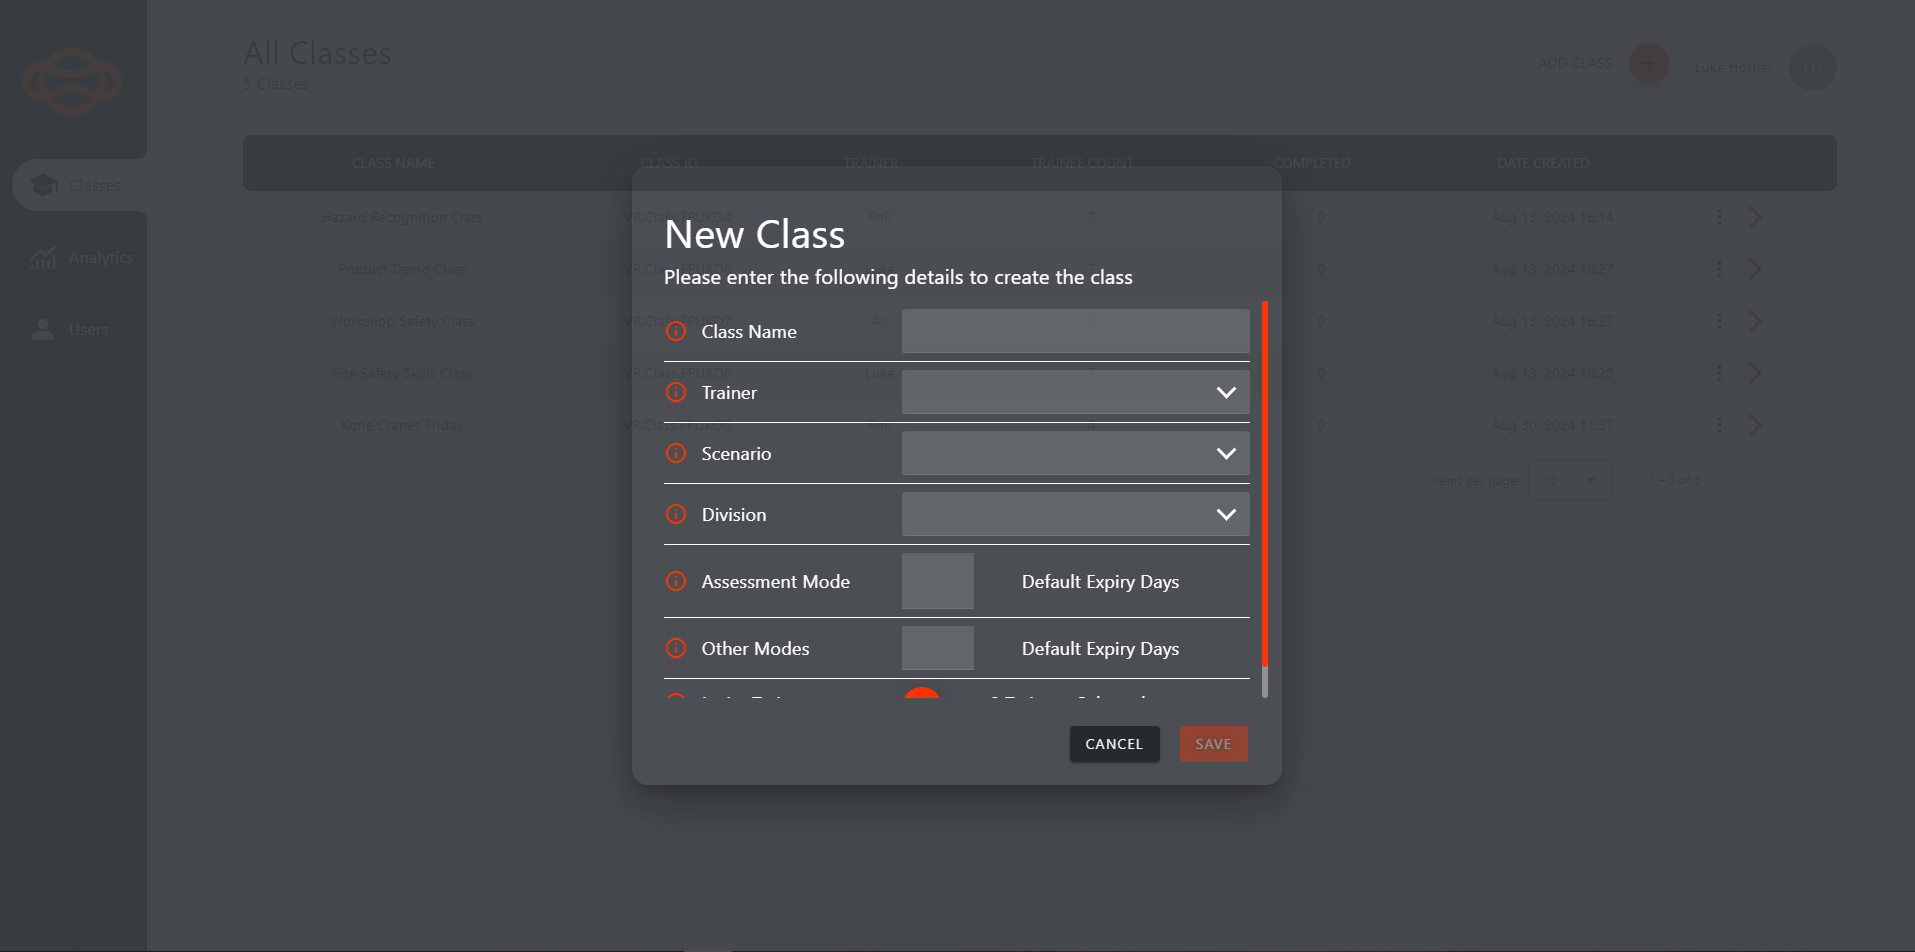
“New Class” Creation Window
A detailed breakdown of each required field can be found below.
Class Name: The name of the class that will appear in the portal.
Trainer: The allocated Trainer for this class.
Additional Trainer: The allocation additional Trainer for this class, if for any reason the first Trainer is unavailable.
Scenario: The assigned content for this class. Users within the class will have access to this content.
Division: The division in which this class sits.
Assessment mode: The amount of days an assessment mode session will expire after.
Other Modes: The amount of days any other mode session (Assisted Learning/Practice) will expire after.
Invite Users: Opens a window allowing Trainees to be assigned to the class.
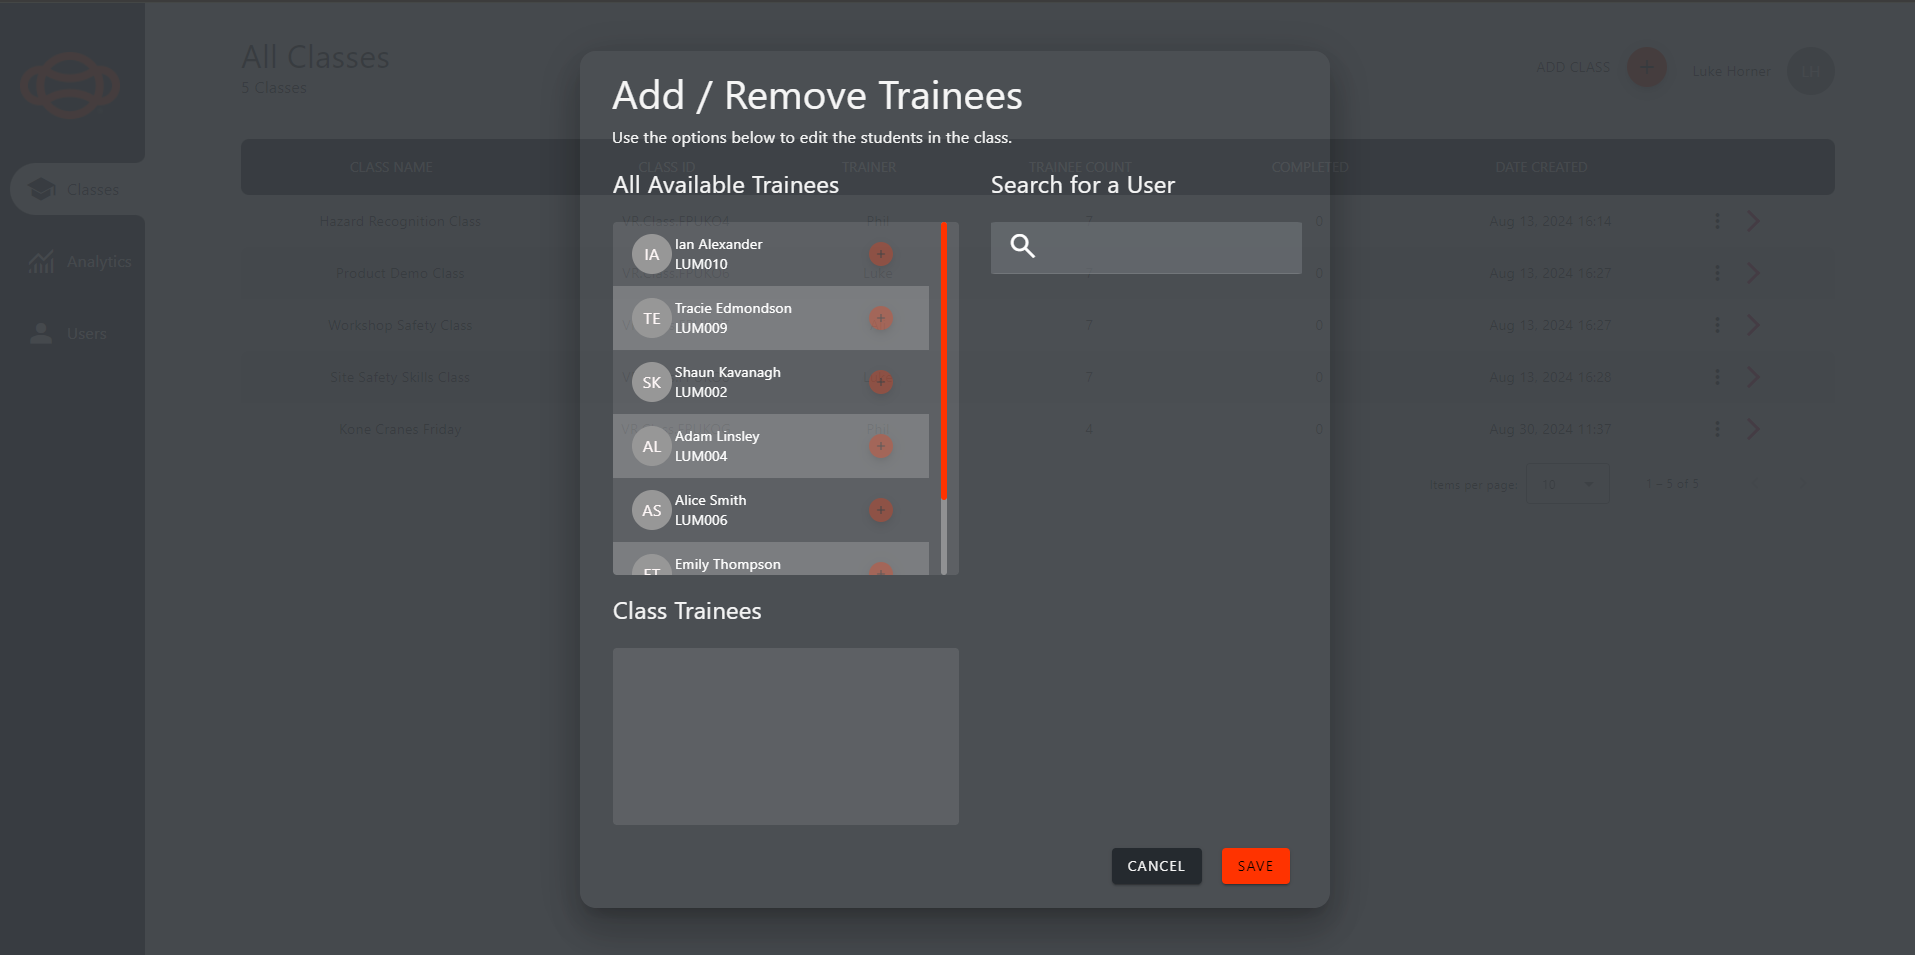
Add / Remove Trainees Window
Using the “Add / Remove Trainees” you can assign Trainees to your class by searching the “All Available Trainees” window or by searching using the search bar. To add users to the class, press the + sign on the user row, once a user has been added to the class, they will appear in the below “Class Trainees” section.
Once all these required fields have been filled in, pressing the “Save” button will create the class and the created class will appear in the “All Classes” list.
Editing & Deleting a Class
You can also edit or delete your classes, via the “More Actions” drop down. Selecting the “More Actions” button on the right side of the class row will reveal the “Edit” & “Delete” buttons.
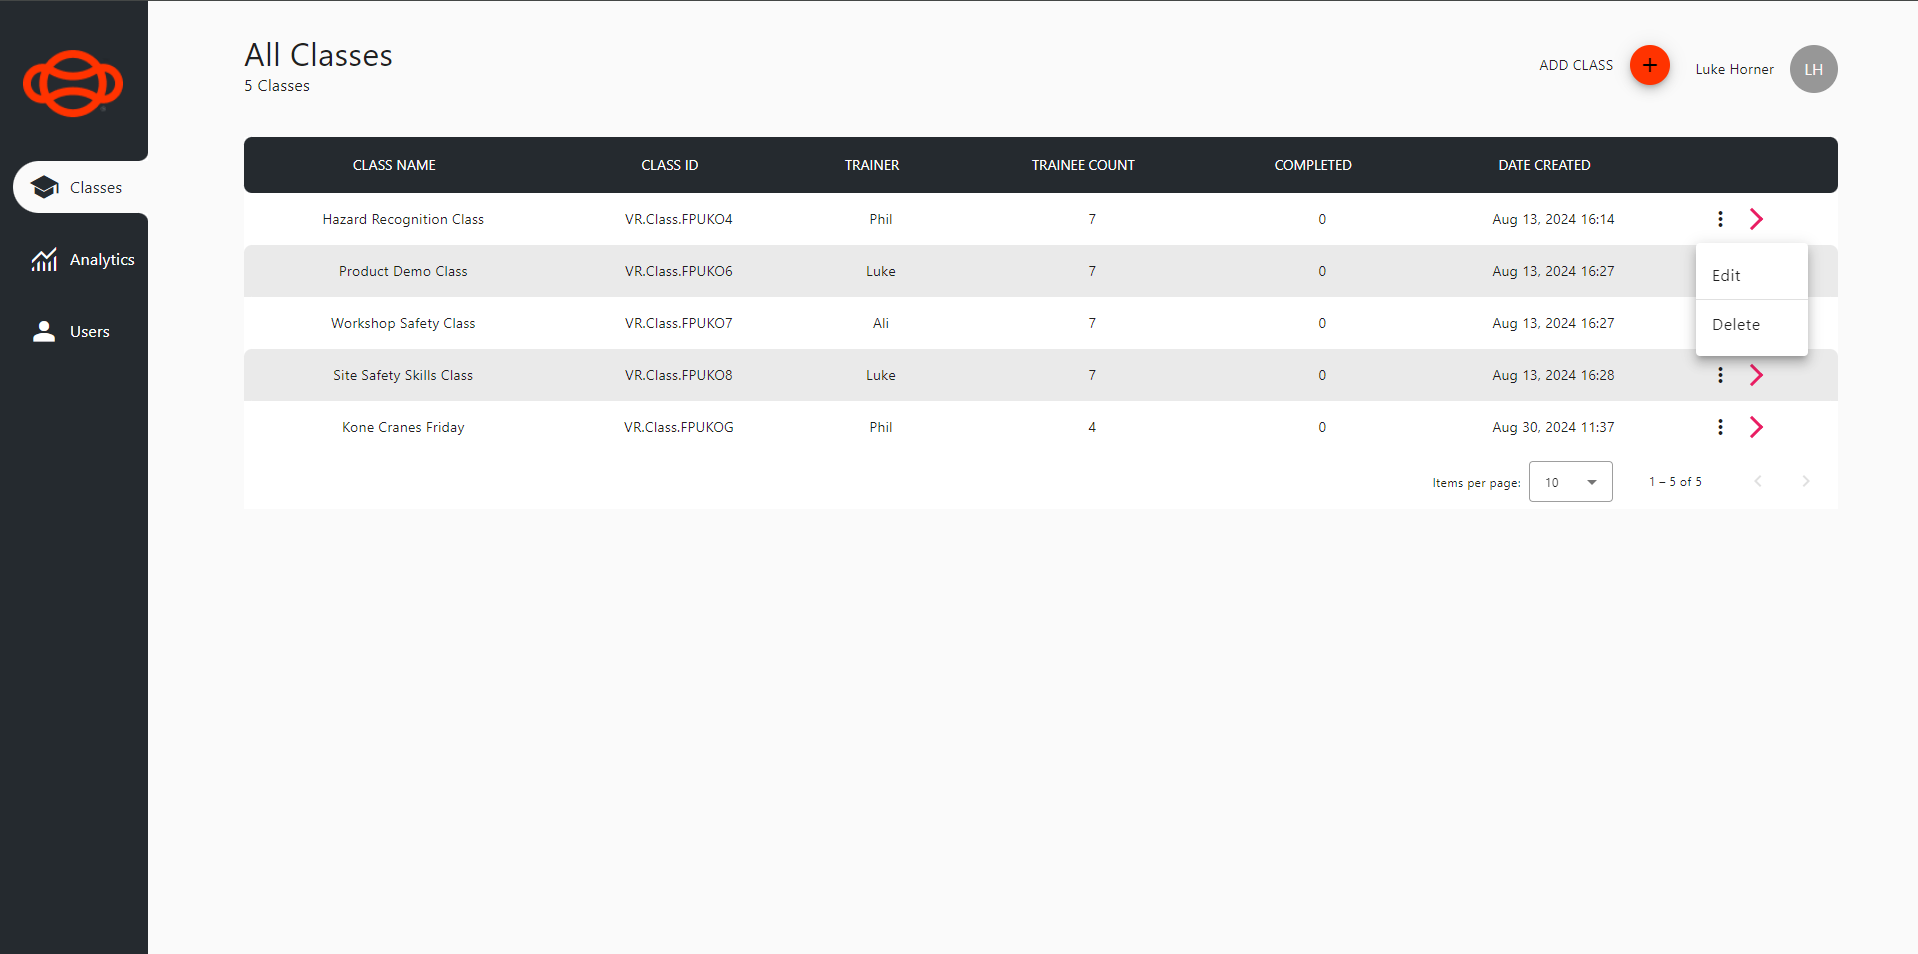
Class More Actions
Selecting the “Edit” button will open the “Edit Class” window, allowing you to edit any of the previously filled in fields, assign more content to the class, adjust the Trainees in the class and more.
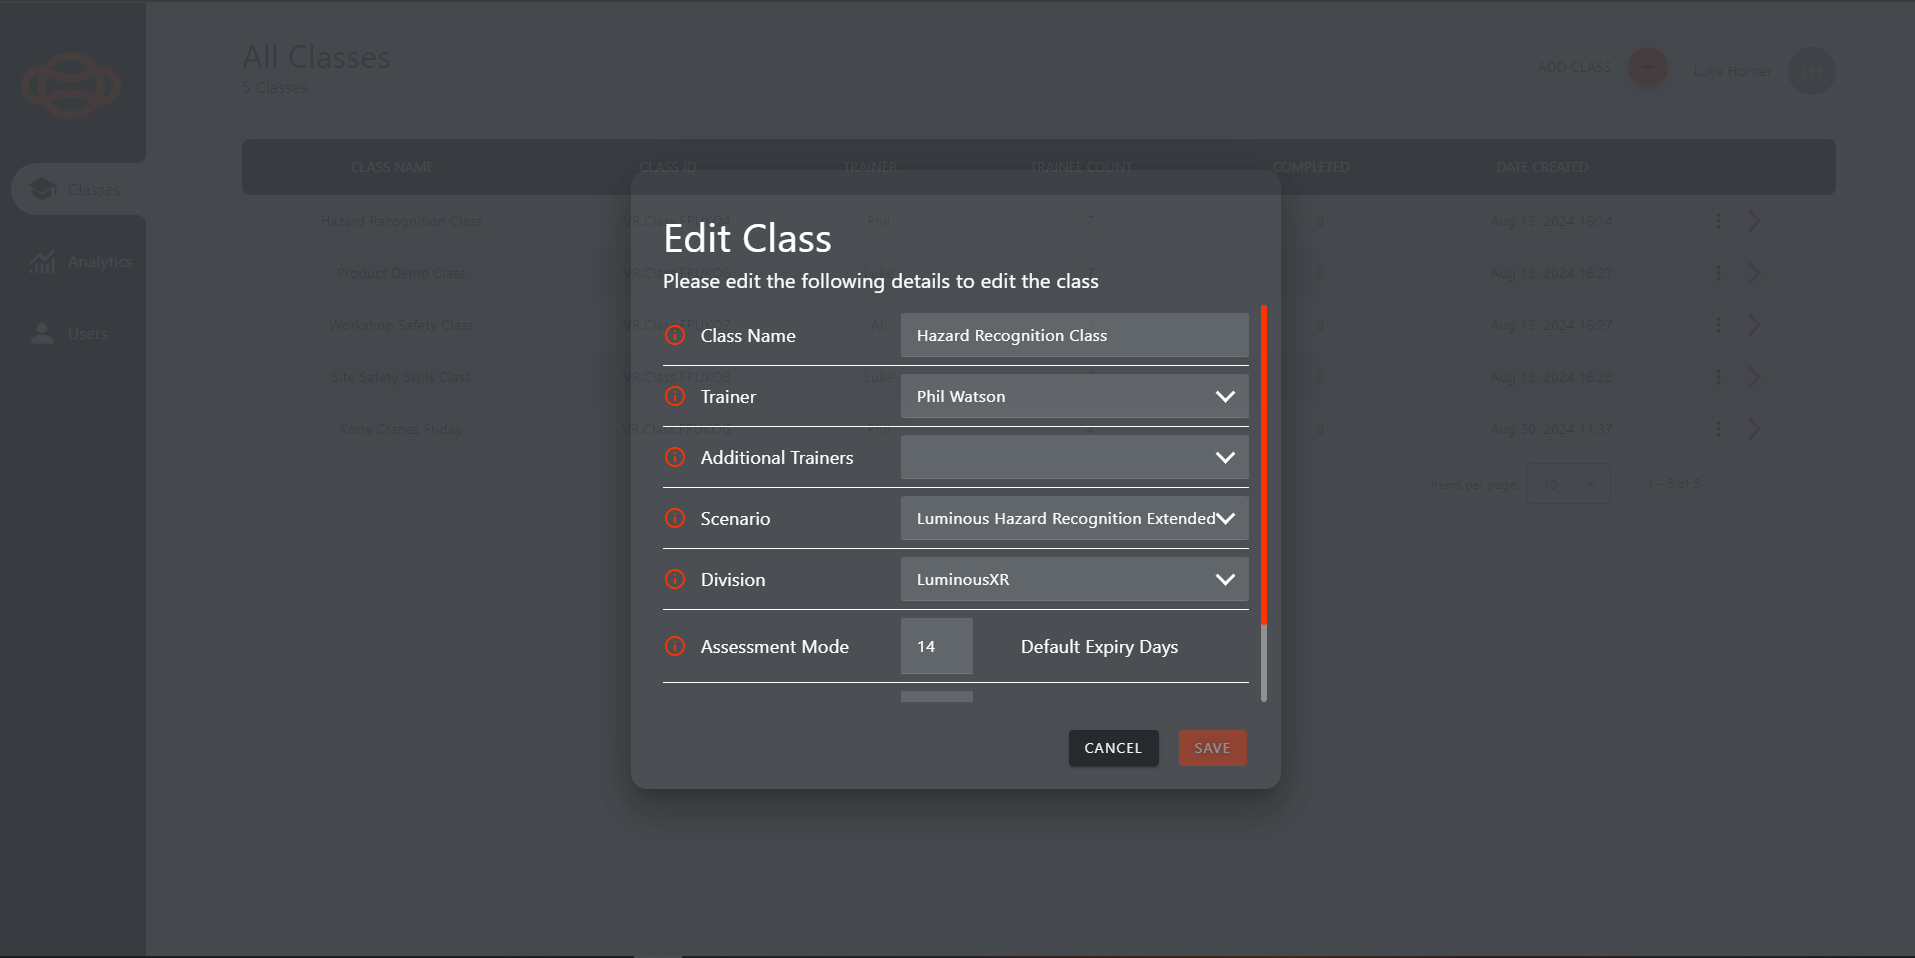
Edit Class Window
To delete a class, select the “Delete” button from the more actions drop down. This will open the “Delete Class” window. You will be required to type the class name into the field and confirm you want to delete the class.
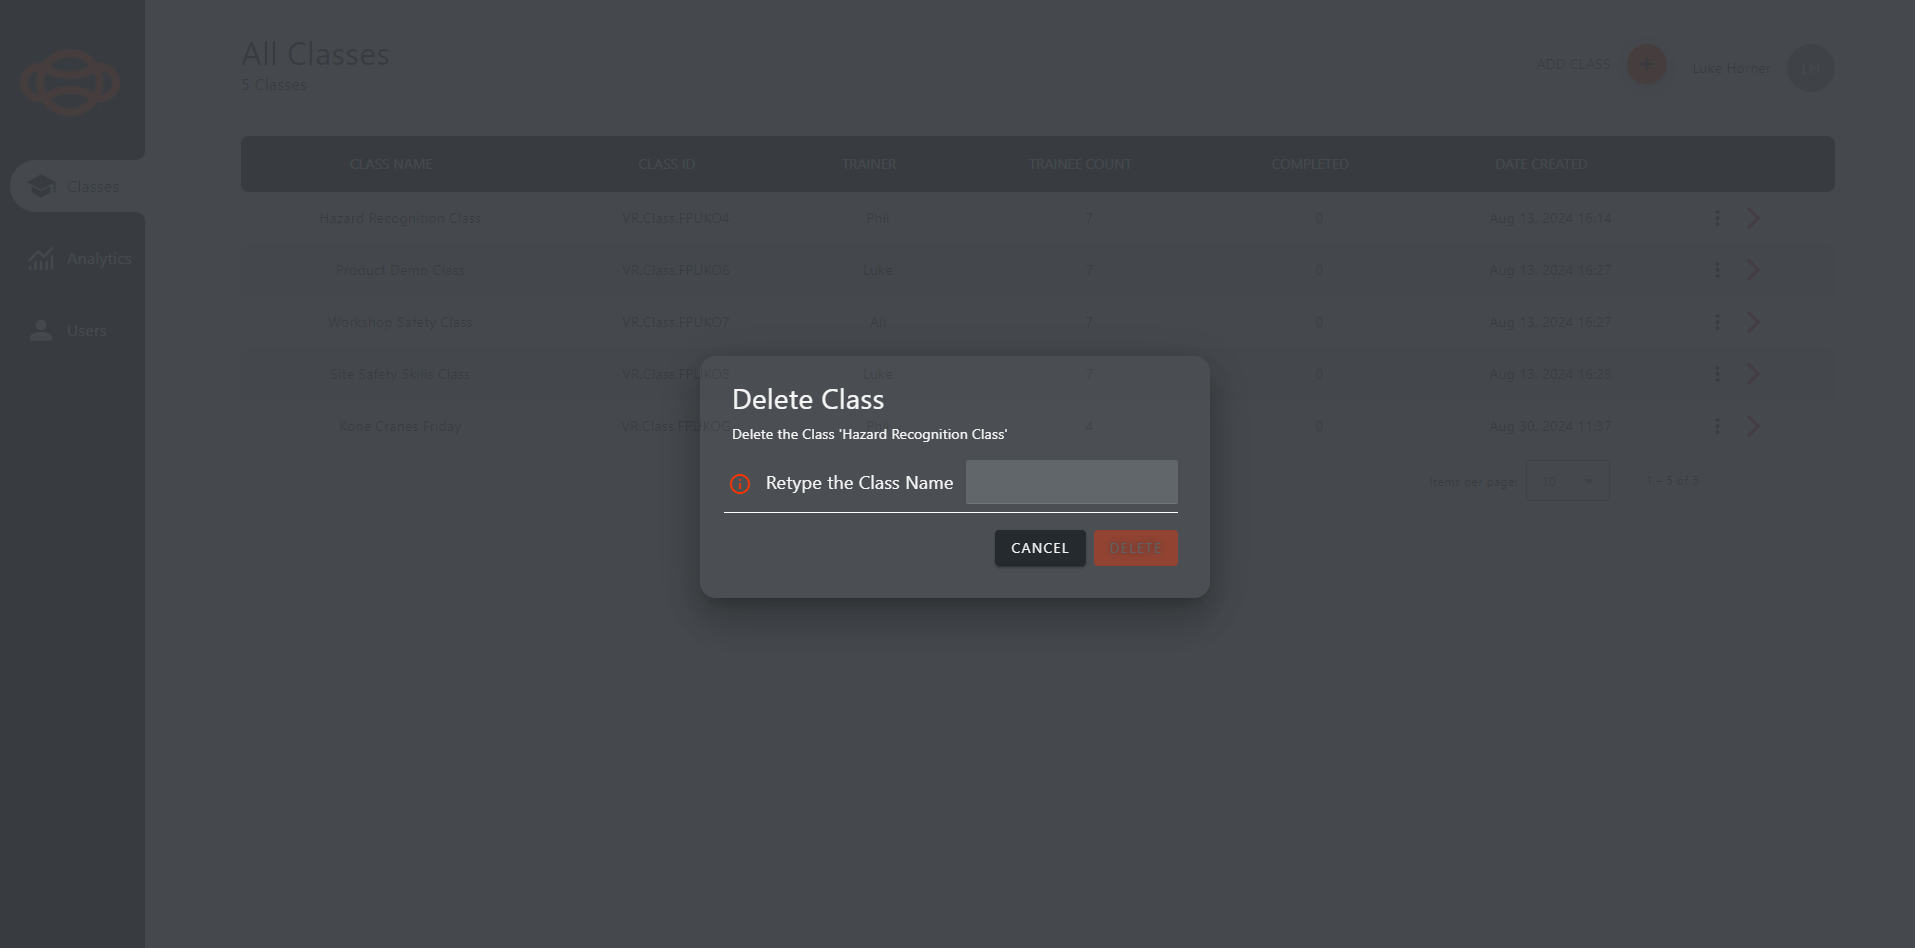
Delete Class
NOTE: Some Data from deleted classes will remain on the portal, due to them being assigned to the Trainees individually, such as certificates, achievements etc. but class data would be deleted.
Viewing a Class
To enter and view a class from the All Classes page, select the chevron on the far right of the class row.
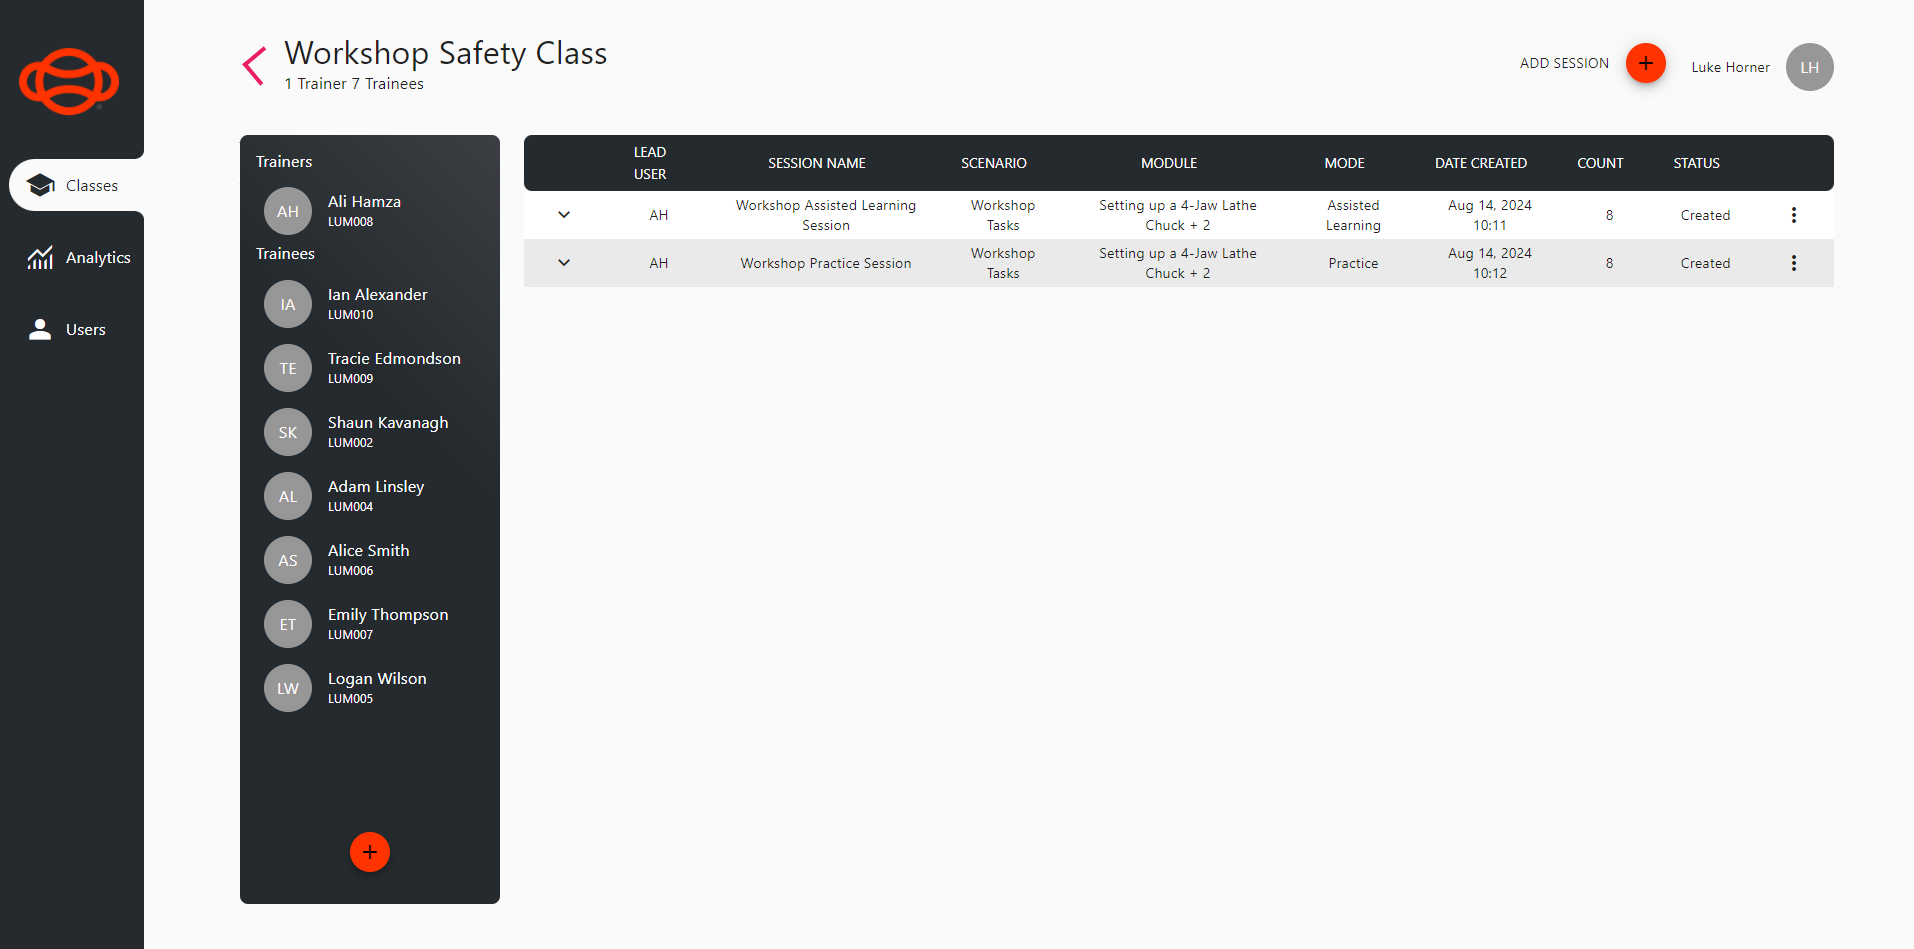
Class View
When in the Class view, you can see a list of the Trainers and Trainees associated with that class on the left, and a list of any sessions associated with that class on the right.
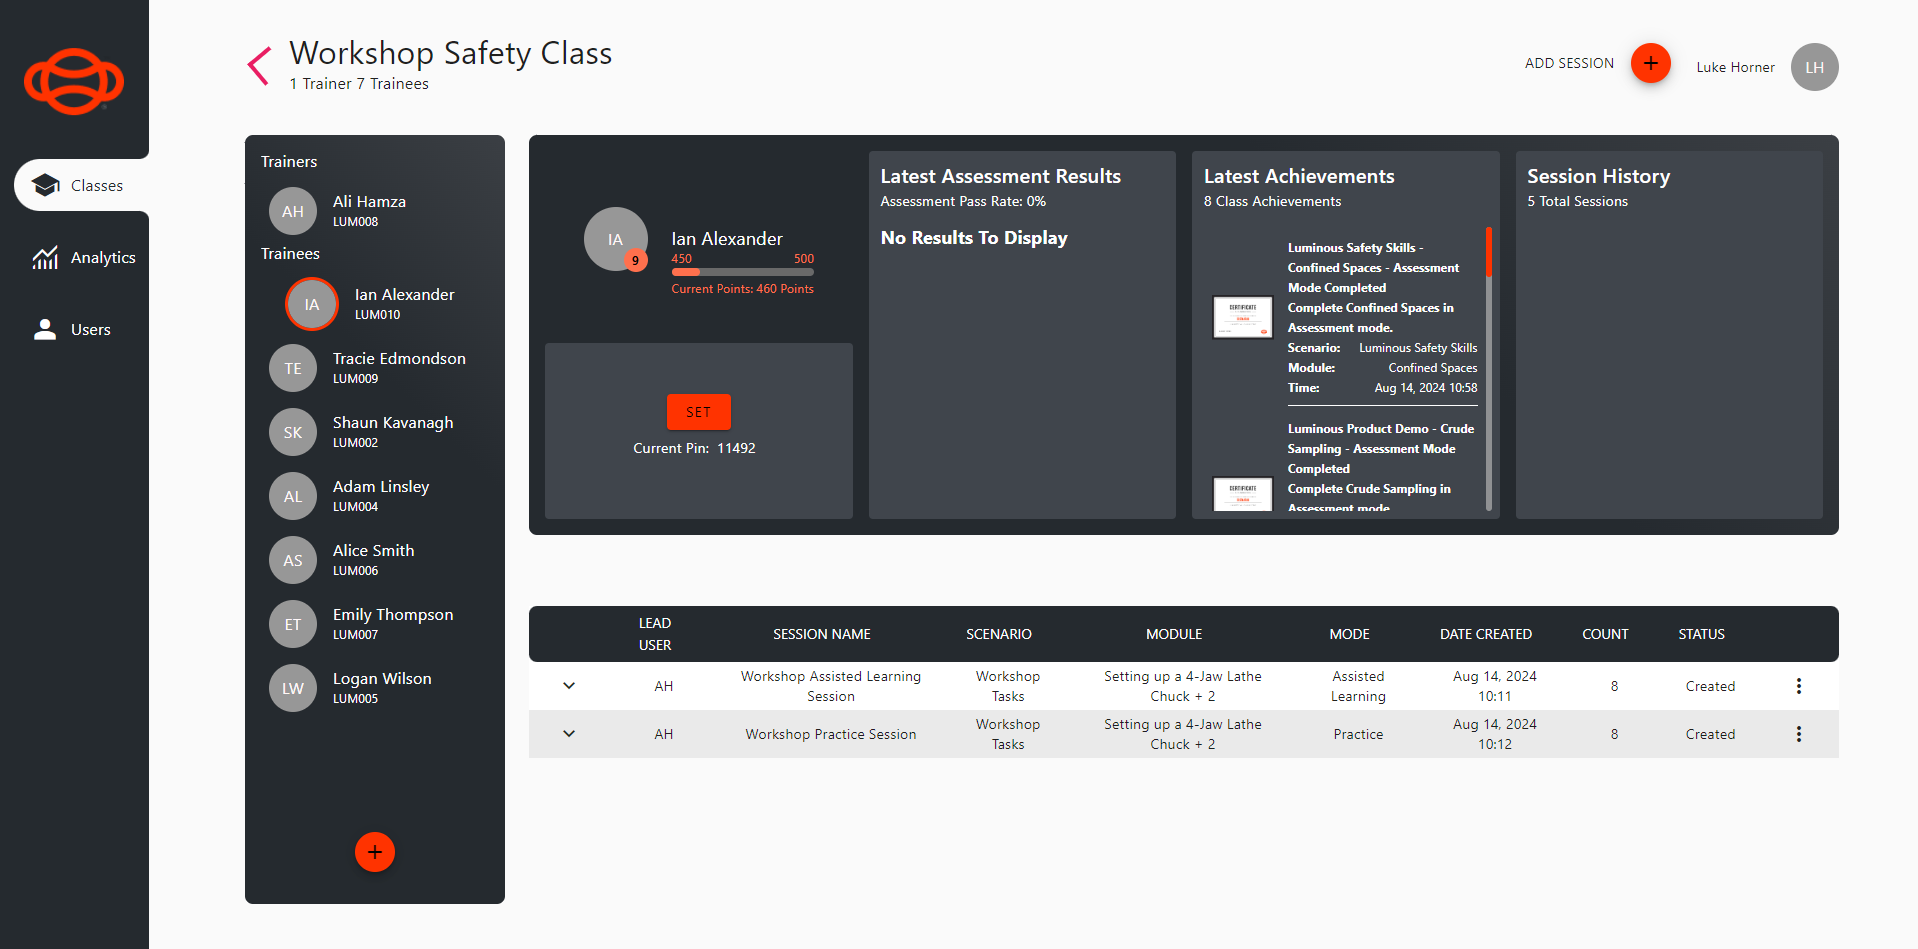
Selected a user on the left will adjust the table to show you the users profile data and filter the session list to only show sessions related to that user. Data that is shown on the user profile includes the below:
User Level: Linked to gamification elements in scenarios, where users will achieve points based on certificate and achievement unlocks.
Pin: Used to log in to the desktop or virtual reality application.
Latest Assessment Results: A collection of results from latest assessment sessions.
Latest Achievements: A collection of certificates and achievements that the user has unlocked.
Session History: Shows the users activity, when they start a session etc.
You can also expand sessions in the class to see additional information such as all the users invited, when it was completed and comment on sessions when required, by selecting the chevron on the left side of the row.
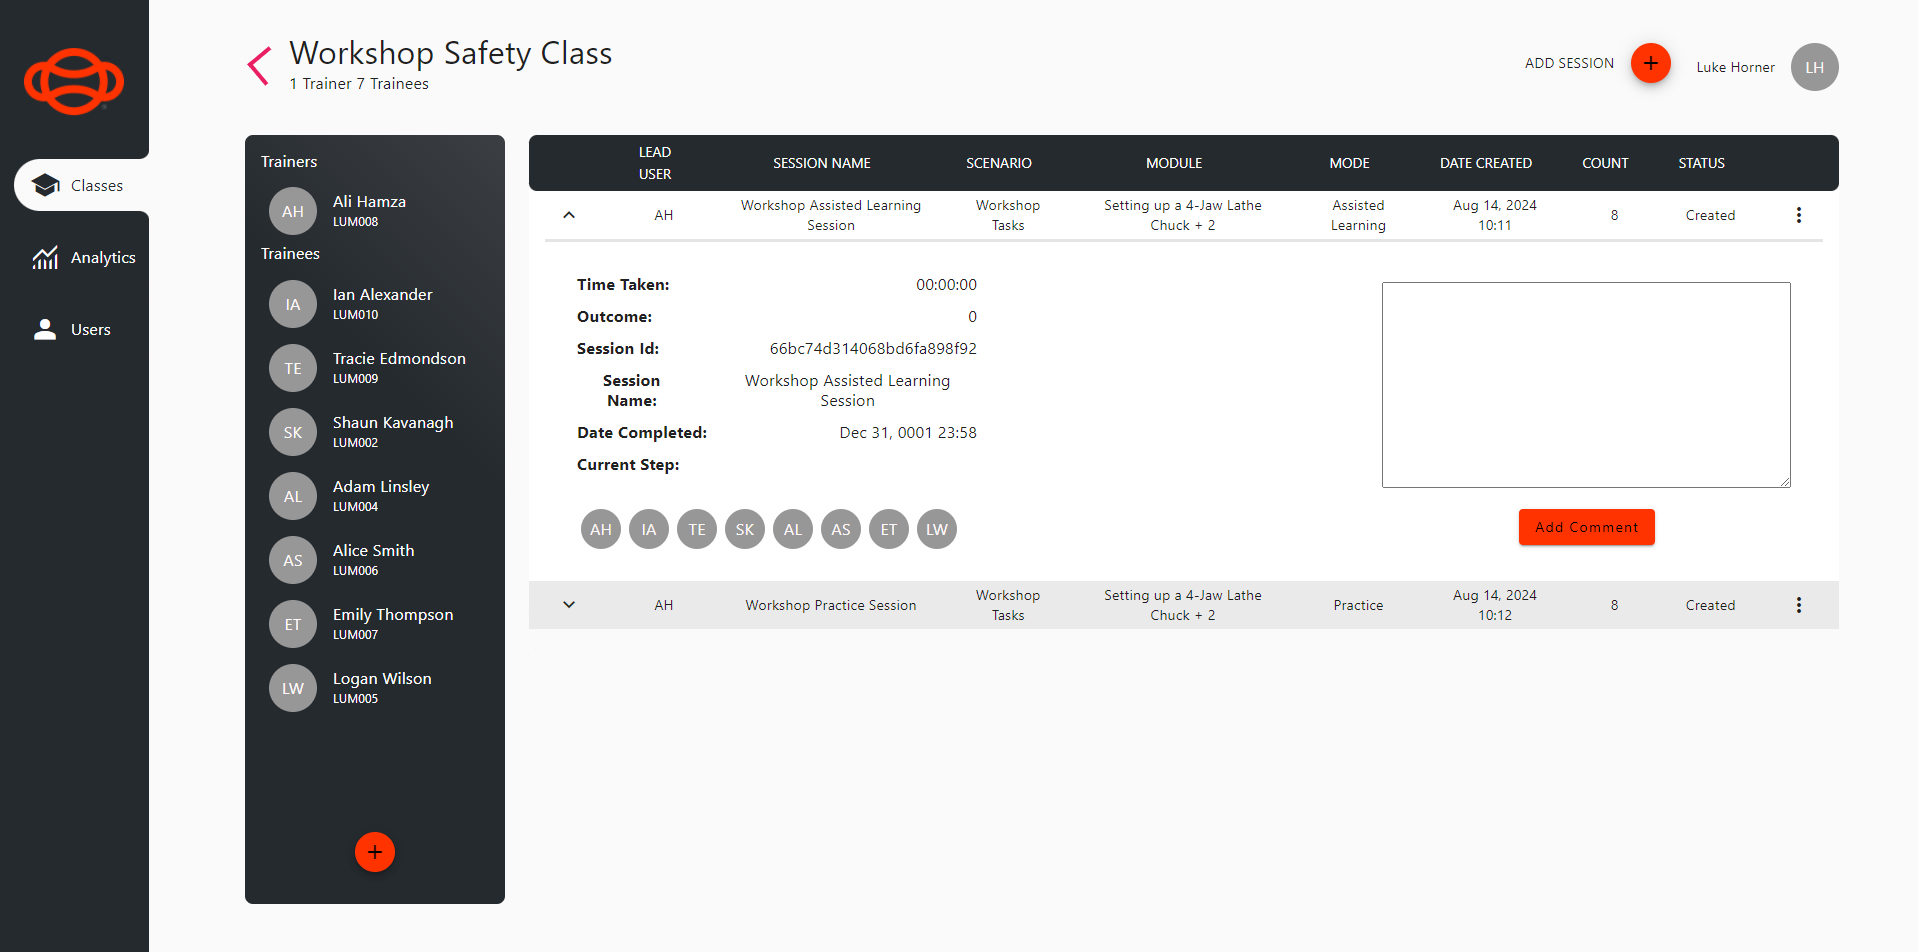
Class View Session Extended
Creating a New Session
To create a new session, when in a class view, you can select the “Add Session” button in the top right of the window. This will open the “New Session” Window. Details of the required fields can be found below.
Sessions for Multiuser or Assessment sessions must be scheduled in the portal.
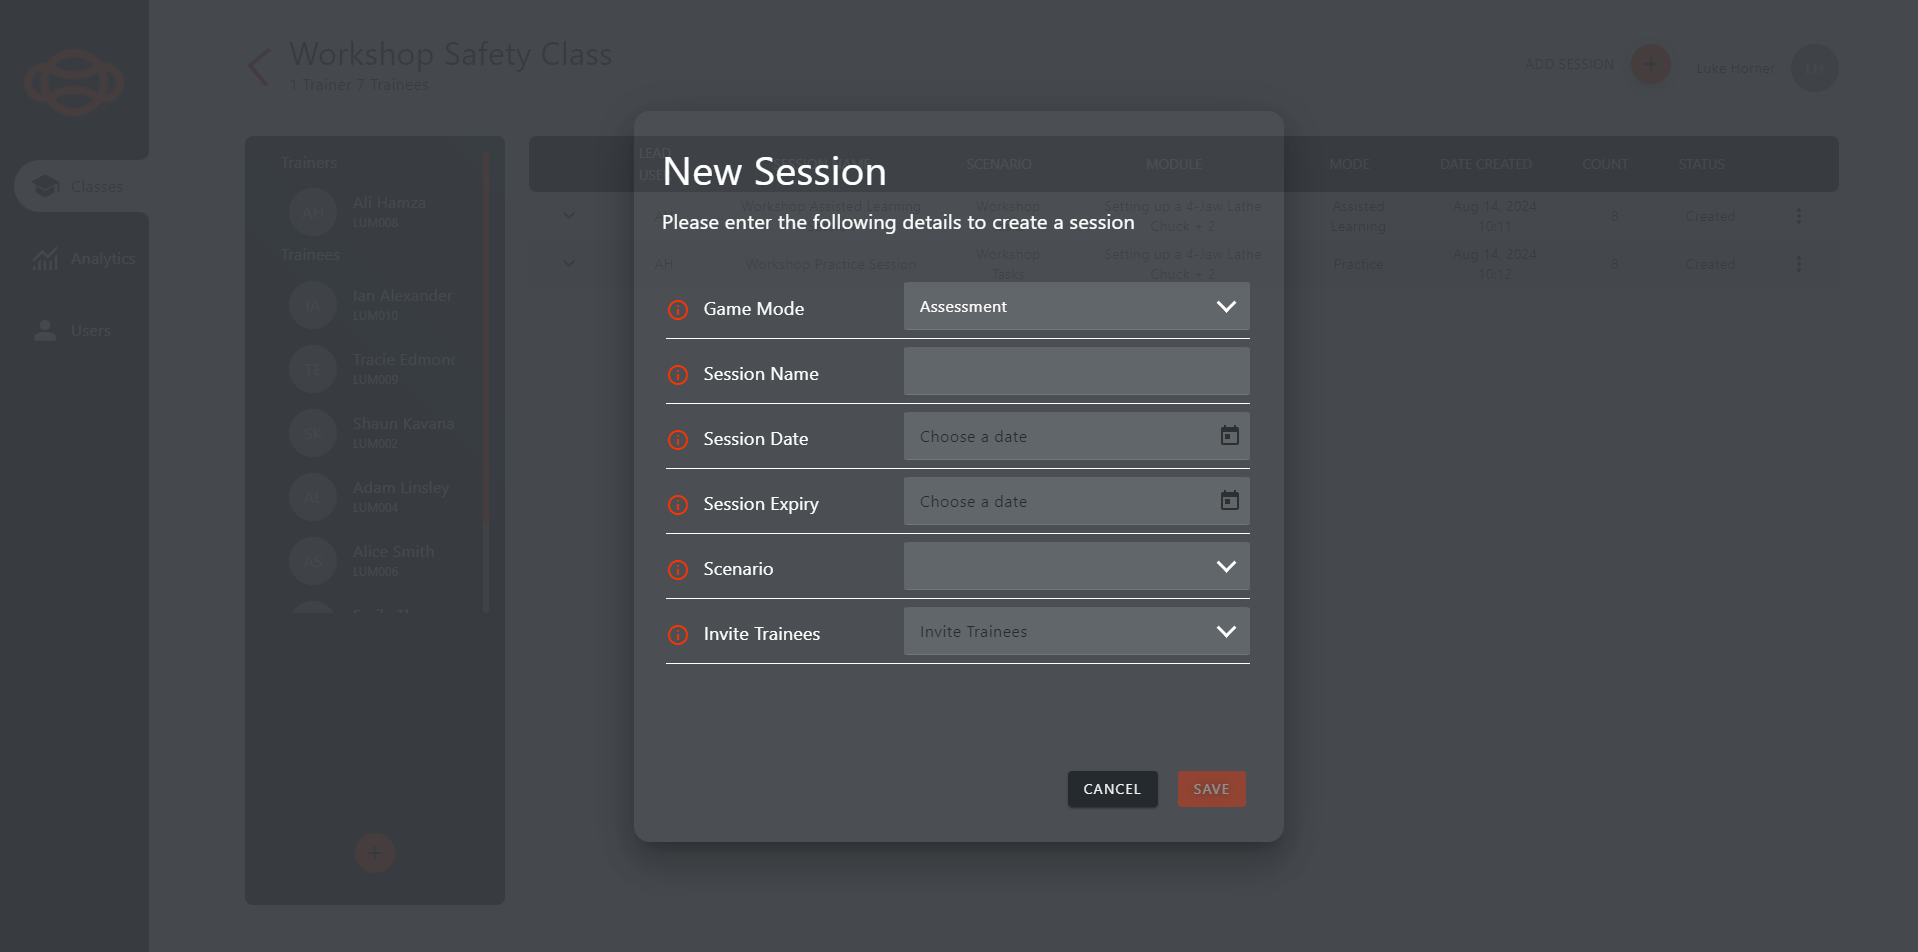
New Session Window
Game Mode: Used to select the game mode for the session.
Assisted Learning: A guided experience designed to teach users the correct procedure.
Practice: Removing guidance users have to recall the correct procedure/information, performing a step incorrectly, users will be able to attempt again.
Assessment: A mode designed to officially assess a users knowledge, completing it successfully will result in a certificate unlock. Performing a step incorrectly will result in failing the session.
Session Name: The name of the session that will show in the portal.
Session Date: The time and date the session will begin, allowing you to schedule sessions for future use.
Session Expiry: The time and date the session will expire, once expired, the session will not show up in the desktop or virtual reality application
Scenario: The Umbrella term used to describe training content, such as “Hazard Recognition”.
Module: The specific piece of content to assign to the session, such as “Warehouse”.
Invite Trainees: Allows you to invite users to the session, if the session is an assessment session, only 1 (one) user can be assigned. In a Multiuser session, you would also be required to assign a “Lead” user in this window, the “Lead” user will be given additional controls in the session, and act as the Trainer.
Once the required fields are completed, and the “Save” button pressed, the created session will appear in the Class view, and on the scheduled time and date, the session will be selectable in the application to join and start.
Editing & Deleting a Session
Session can also be edited or deleted in the class view. By selecting the “More Actions” button on the right side of the row. It will open the more actions drop down.
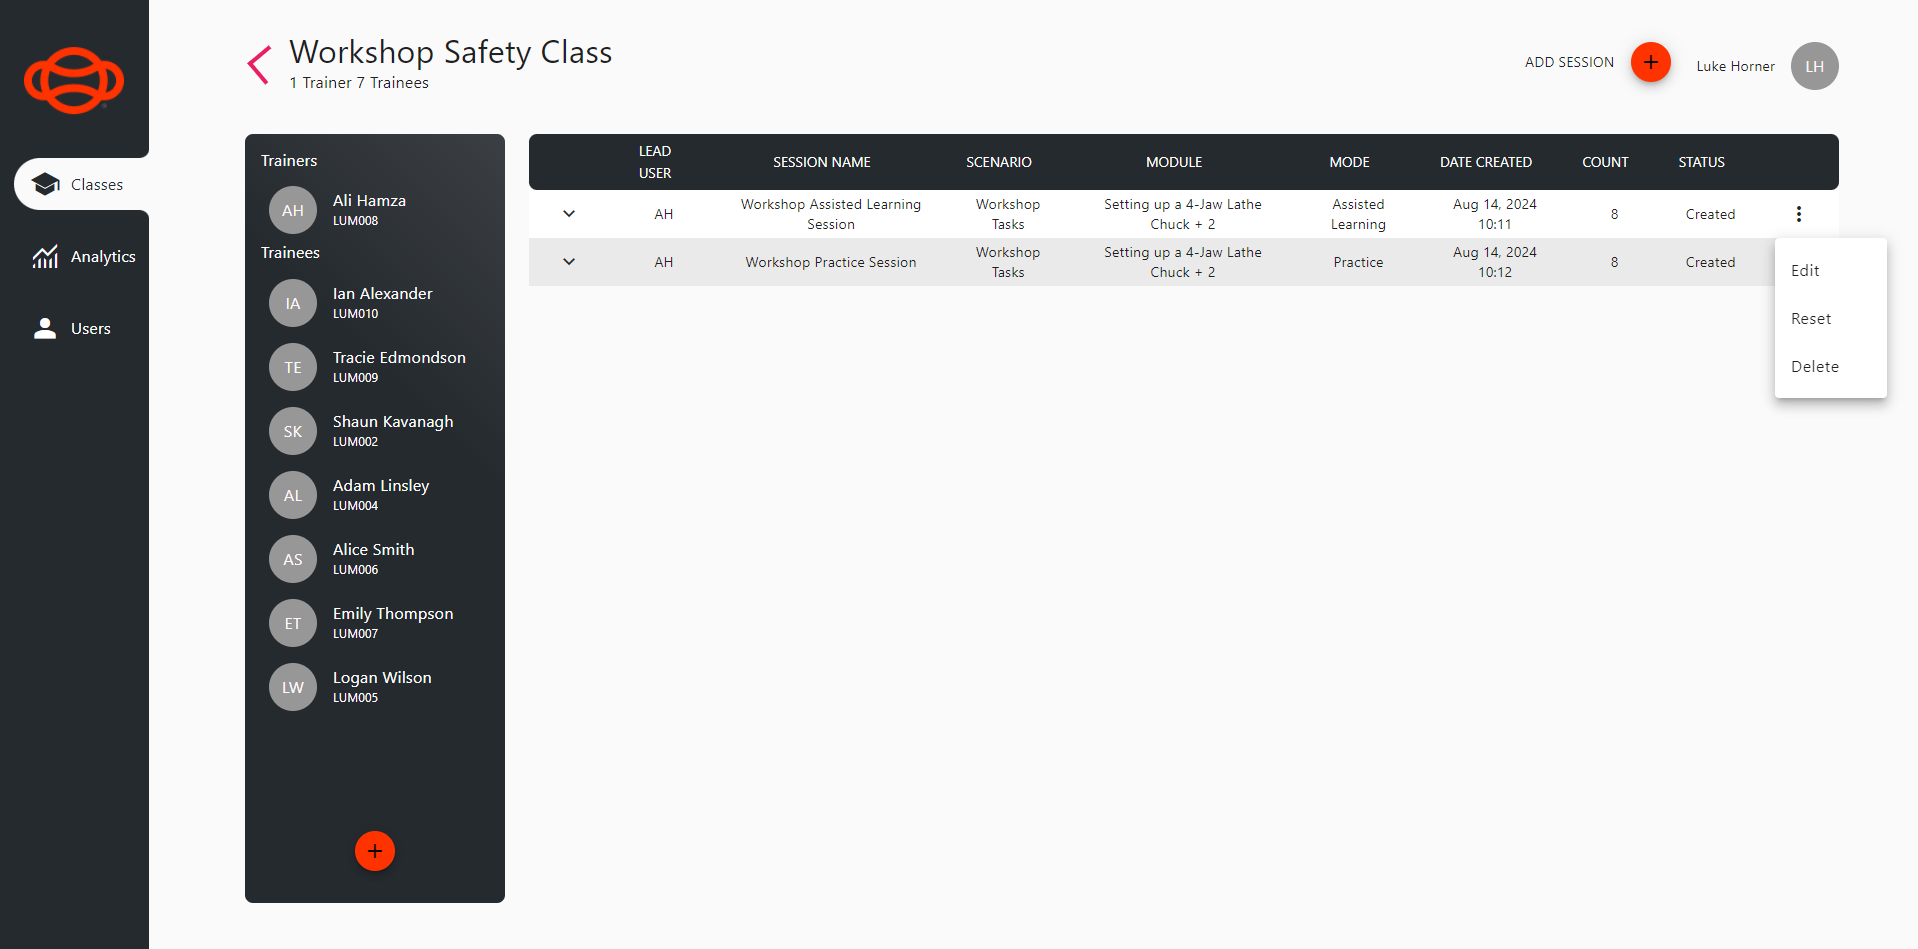
Session More Actions Drop Down
With the drop down open, selecting “edit” will open the “Edit Session” window, allowing you to edit all the fields that were completed when creating the session. Inviting an additional user to an existing session is as easy as editing the session, selecting the “Invite Trainee” field and assigning the new user to the session.
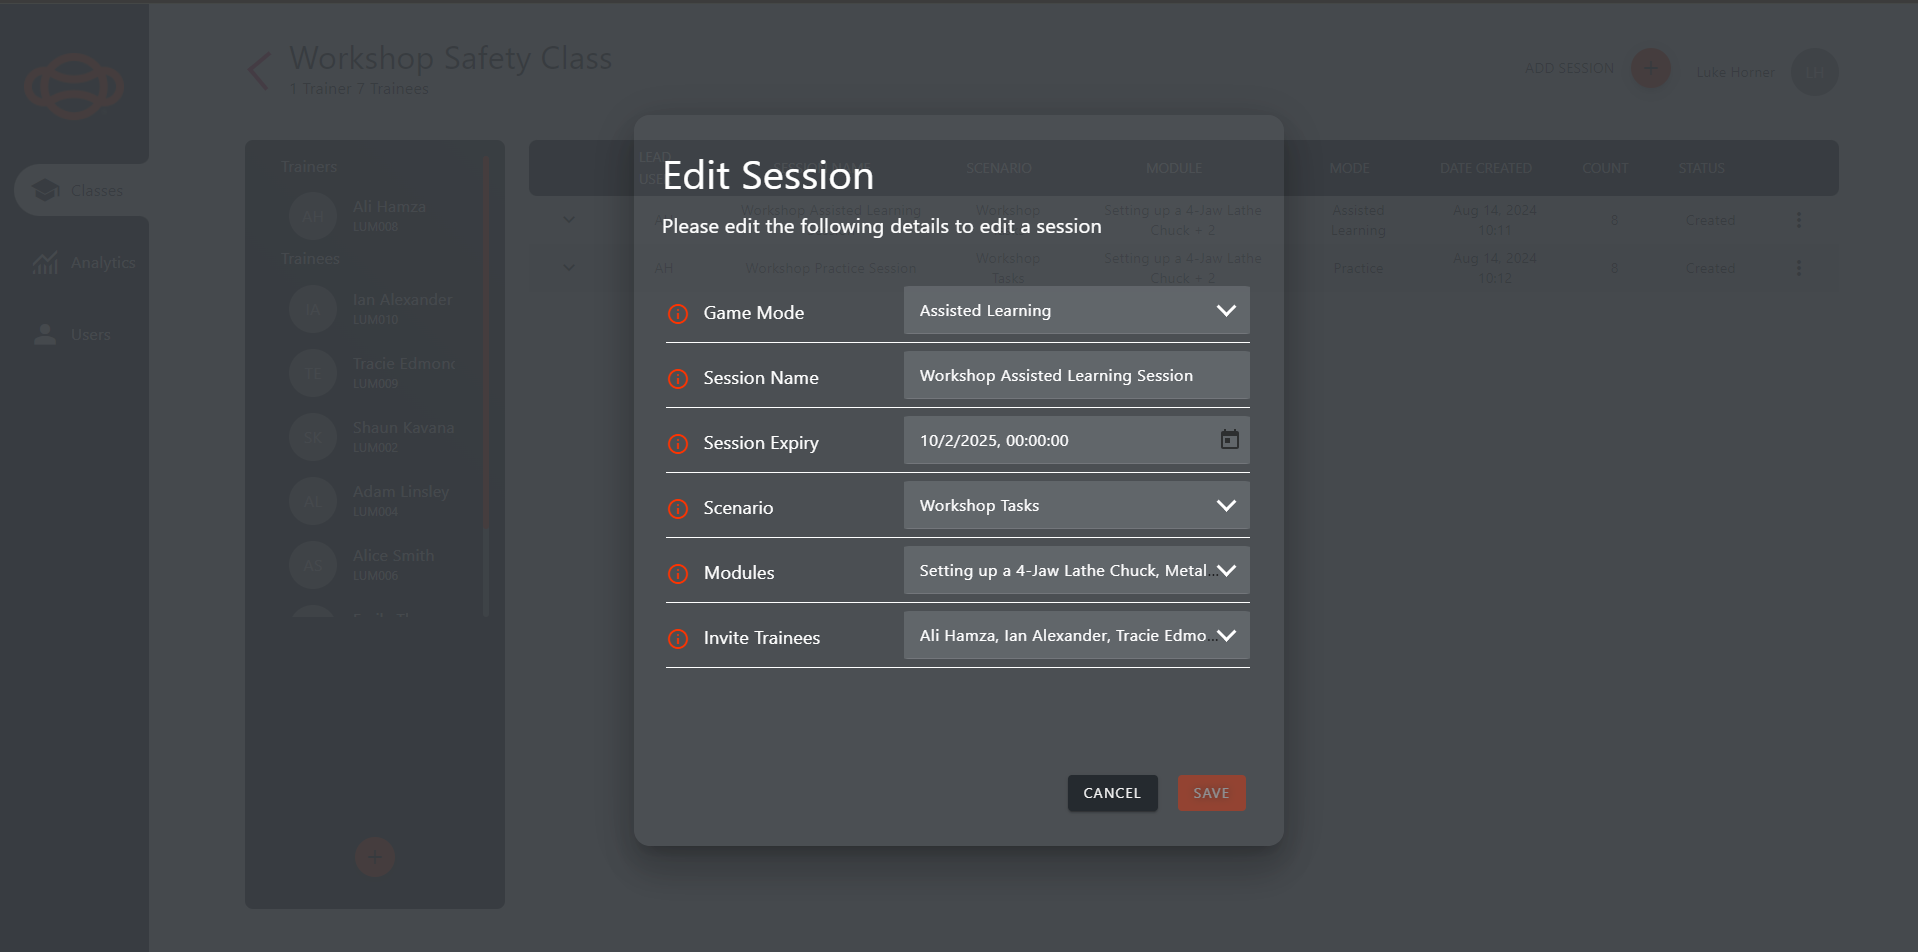
Edit Session Window
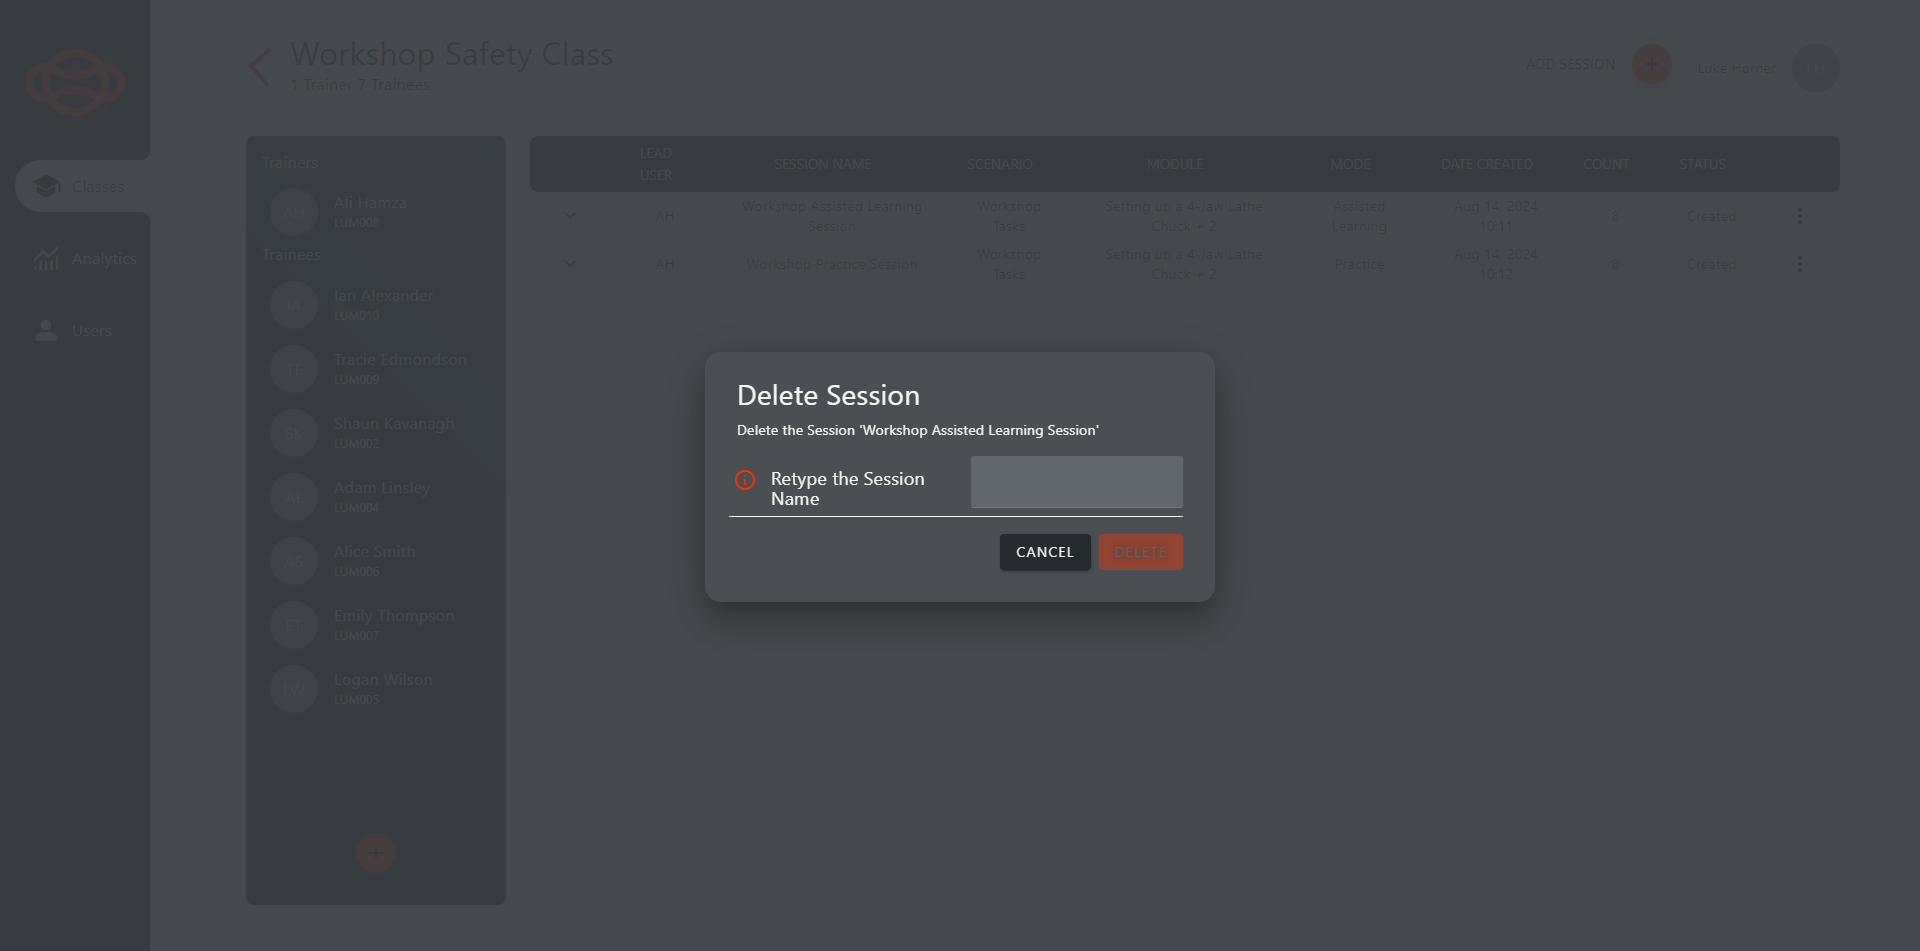
You can also delete sessions you no longer want in the portal by selecting the “Delete” button, this will open the “Delete Session” window, where you will need to retype the session name in order to delete the session.
NOTE: Some Data from deleted Sessions will remain on the portal, due to them being assigned to the Trainees individually, such as certificates, achievements etc. but Session data would be deleted.
NOTE: The branding on page may differ from the images above but functionality will remain the same.
Roles and Functionality within this page
Functionality | Administrator | Trainer | Trainee |
|---|---|---|---|
View Page | Yes | Yes | No |
Creating a Class | Yes | Yes | No |
Editing & Deleting a Class | Yes | Yes | No |
Viewing a Class | Yes | Yes | No |
Creating a Session | Yes | Yes | No |
Editing & Deleting a Session | Yes | Yes | No |
