
Setting up a Power Tool Tutorial
Feature Summary
What is the feature?
This feature is an interactable power tool, designed to provide an immersive user experience by simulating realistic tool behaviour, as well as completing usable steps in Flow. The power tool can exist in several operational states including 'Off', 'On' (not in contact with any colliders), and 'On' (in contact with colliders), each with distinct audio and visual effects.
What situations are suitable to use this feature?
This feature is suitable to use in any scenario within Unity where you need to create a realistic and immersive user experience with power tools.
Is this feature a requirement of all future scenarios?
No, this feature is not a requirement for all future scenarios. It is only necessary when your Unity application or game specifically requires the use of controllable and interactive power tools. If your project does not involve the use of such tools or does not require different states of tool operation and the related effects, then this feature may not be needed.
This document provides a step-by-step guide on how to configure a power tool within the Unity engine. The term "power tool" in this context refers to an interactable object that the user can control and activate, such as a welding torch, a grinder, or a drill. This differs from non-powered tools like hammers, screwdrivers, or paintbrushes, which don't have an "on" or "using" state.
Feature Example Use Case
VR Screen recording of a Welder Implementation of a Power Tool Usable
In this example we can see a Power Tool Usable being used against a broken pipe. For this scenario the User is fixing the broken pipe and so the Power Tool Usable is used to progress the user through the Usable
Understanding Power Tool States
Understanding these states and their distinct characteristics will help you set up your power tool to behave as intended during different stages of interaction.
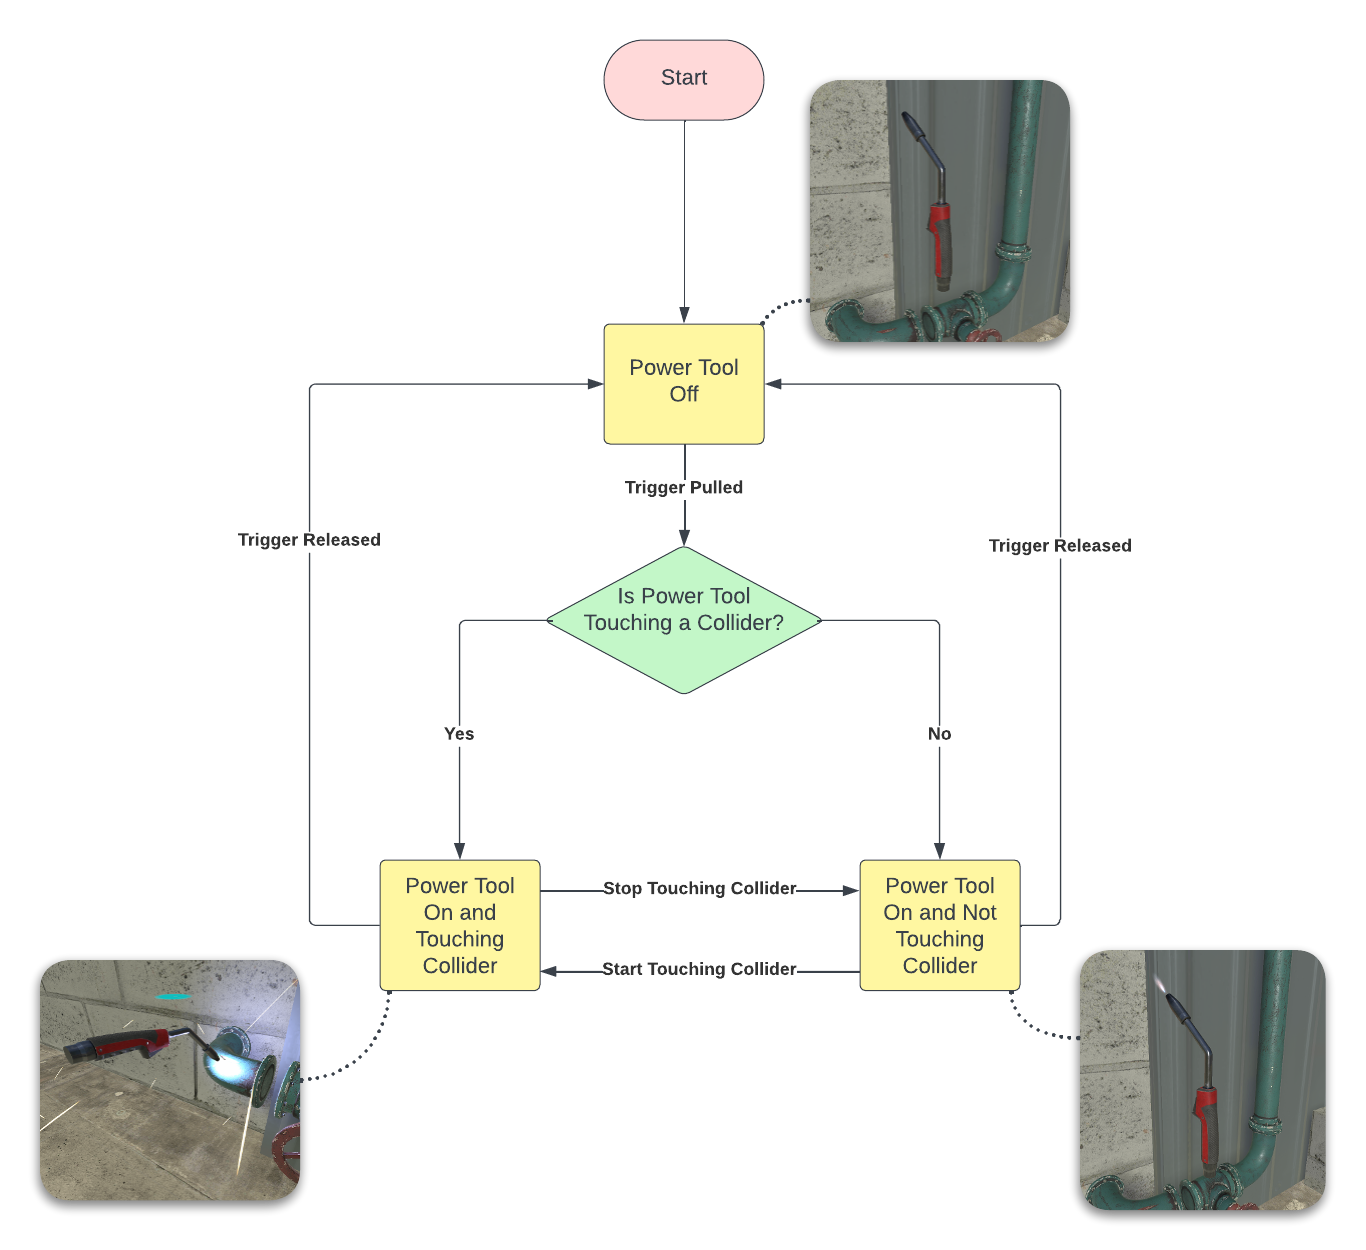
States of the Power Tool
Power Tool States Explained
As depicted in the flowchart above, each state has distinct characteristics:
Off State: This is the default, idle state where the power tool is inactive. During this state, no effects, audio, or extra GameObjects are being controlled or triggered.
On State (Not Touching Any Colliders): When the power tool is activated but not interacting with any colliders, certain particle effects and sounds come into play. This state simulates the power tool being active in 'standby' mode.
On State (Touching Colliders): This is the fully operational state of the power tool, characterized by interaction with a collider. In this state, additional particle effects are deployed, and unique audio cues are activated, offering a dynamic, immersive user experience.
Feature Setup Instructions
The first step in creating a usable Power Tool Object is to first create a Grabbable object. A full tutorial on how to set up a grabbable is here, but we will briefly go over what components are used below.
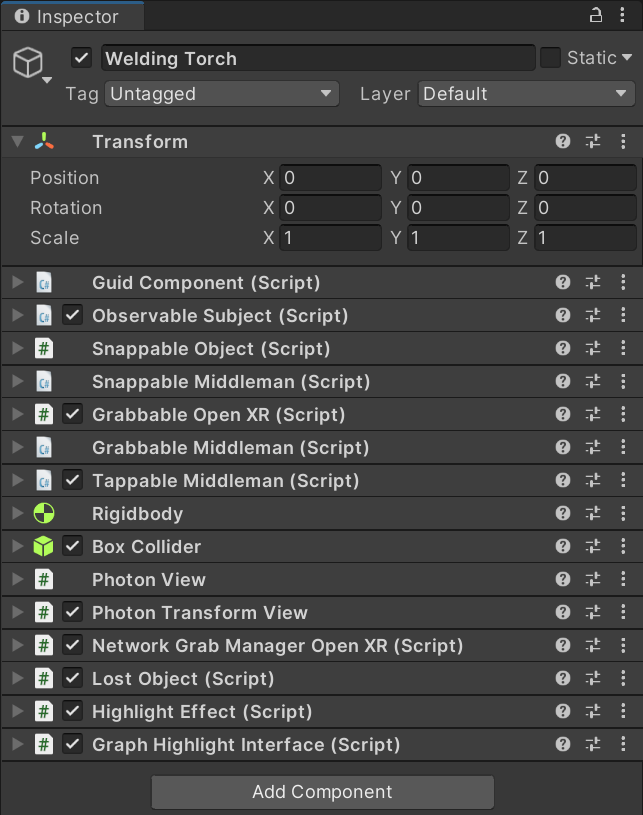
Begin by creating an empty Parent object in the hierarchy. For this example, we'll use a welding torch, but this should ideally be named after whatever your power tool is called. Then add the following components:
Guid Component: Every object interacting with the flow requires this.
Observable Subject Component: This component is also essential.
Snappable Object: Include this if the object needs to snap to specific locations.
Snappable Middleman: This script communicates the functionality of the snappable object to Flow.
Grabbable Open XR: This handles the logic related to object grabbing.
Grabbable Middleman: This communicates the functionality of the Grabbable Open XR to Flow.
Tappable Middleman: This is required for any Grabbable.
Rigidbody Component: To provide physics to the tool.
Collider: We chose a Box collider for this example but adjust as necessary. Ensure this collider is only as big as the handle of the object.
Photon Scripts: For setting up multiplayer functionality, use the Photon View and Photon Transform view.
Network Grab Manager Open XR: Necessary for grabs to work when using multiplayer.
Lost Object: Returns the object to the last snap zone when dropped or “lost”.
Highlight Effect: Used to highlight the Object.
Graph Highlight Interface: Used to set the values of the way the object should look when highlighted.
Setting Up Child Objects
Once we have set up the parent object, we need to add a number of children, which will also need their own components adding.
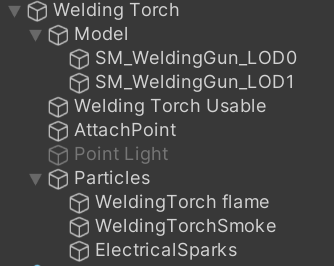
The child objects of the welding torch
Model: Represents the physical appearance of the tool. This should have the components:
Mesh Filter: Object's Mesh
Mesh Renderer: The renderer to see the object.
Welding Torch Usable: Houses the main functionality of the tool, controlling aspects such as particles, audio, interaction with Flow, and more. This again should be named relative to your Power Tool of choice + “Usable”, for this example it's a “Welding Torch”. This should have the components:
Guid Component
Observable Subject
Usable Middleman: So the Usable can interact with Flow
Collider: The collider that is used to represent the bounds of the operational part of the power tool, for the welding torch that's the tip, for a grinder this collider would encompass the grinding disk. The “is trigger” Bool must be set to true on this collider for it to work.
Power Tool Usable: Controls the main functionality of the power tool (Setup described in detail below)
Audio Source(s): For any audio to be played whilst using the Power Tool. Add a new “audio source” for each audio that can be played. In most cases this is two audio sources, one for audio of the Power Tool on and not touching any colliders and another for it being On and touching a collider. Set the Audio Source “play on Awake” bool to false.
Photon view: To handle the Multiplayer aspects of the Power Tool.
Attach Point: An empty GameObject to reference the position the user will hold the tool, referenced in the Grabbable Open XR on the parent GameObject.
Particles: The FX particles that you wish to activate between tool states. These should be created for each new tool and then prefabbed to ensure consistency.
Particle System: Shows particles such as flames, sparks, smoke etc.
(Optional) GameObject: Any game objects you want activated or deactivated on use, for this example we are using a point light, these should be turned off in the hierarchy. This point light is purely for visual and not needed for the tool to work.
Configuration of the Power Tool Component
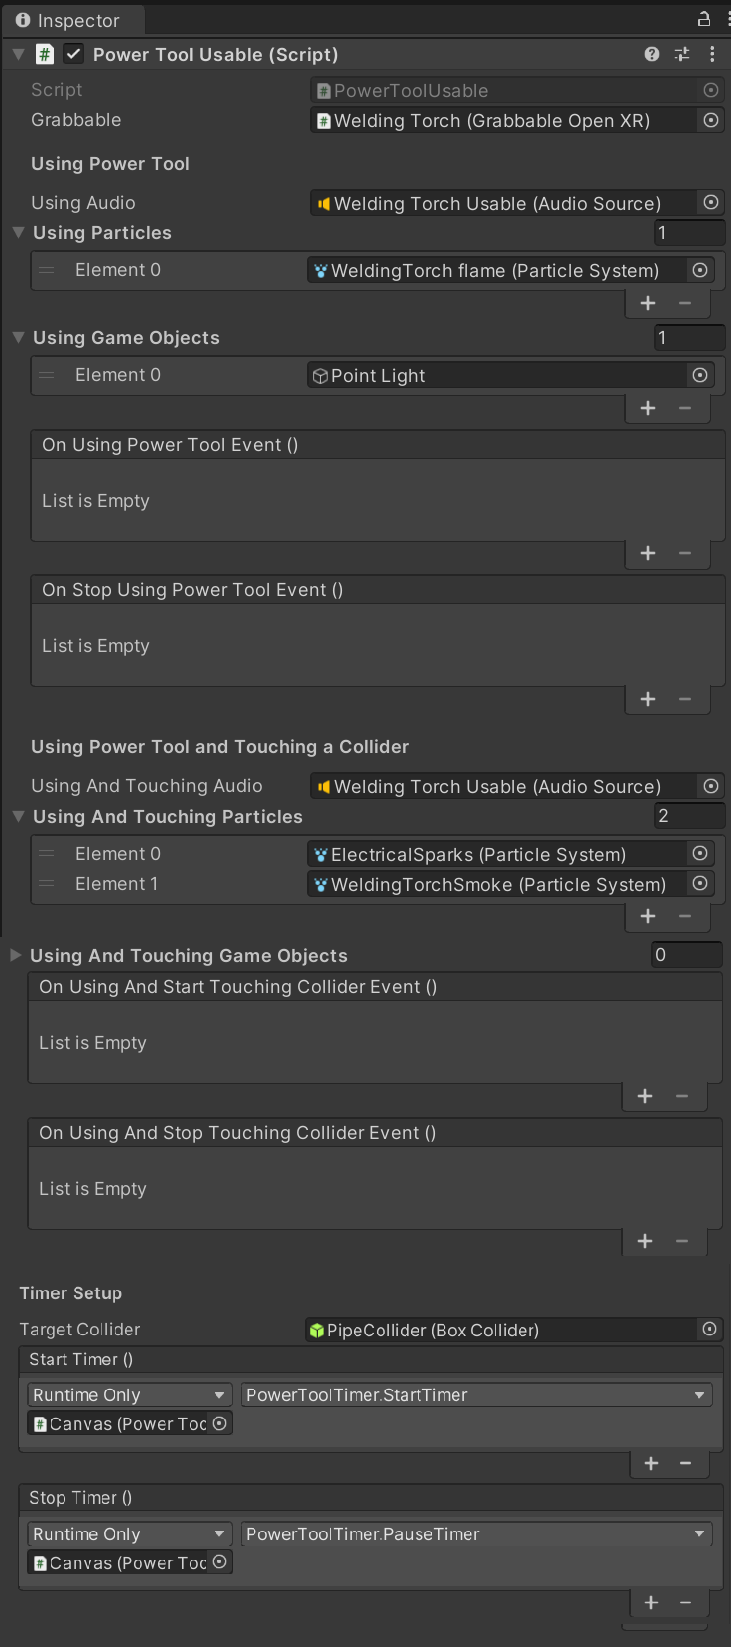
How the Power Tool Usable script looks in the Inspector
Now we can explain how the variables are set up.
Using Power Tool: Contains all effects and audio when the power tool is in use.
Using Audio: Audio that plays while the power tool is active.
Using Particles Array: Visual particles displayed when the tool is in use.
Using Game Objects Array: Any GameObjects that should be activated while using the power tool.
On Using Power Tool Event: Called when you begin using the power tool.
On Stop Using Power Tool Event: Called when the power tool stops being used.
Using and Touching a Collider: Contains all effects and audio for when the power tool is in use and in contact with a collider.
Using and Touching Audio: Audio that plays while the power tool is active and in contact with a collider.
Using and Touching Particles Array: Visual particles displayed when the tool is in use and touching a collider.
Using and Touching Game Objects Array: Any GameObjects that should be activated while the power tool is in use and in contact with a collider.
On Using and Start Touching Collider Event: Called when the power tool is in use and begins contact with a GameObject.
On Using and Stop Touching Collider Event: Called when the power tool is in use and ends contact with a collider. Will also be called when the power tool has stop being used.
(Optional) Timer Setup: Configures the timer to count down when being used on the target collider. Includes Start Timer Event and Stop Timer Event for UI display.
Making it work with the Graph
At this point you should be able to use your power tool in your scene, however there is one last step to make a power tool work with flow. For this step we need to open our graph.
The step in the graph were looking for is called “Use Object”. For more information on the “Use Object” step and other nodes visit here.
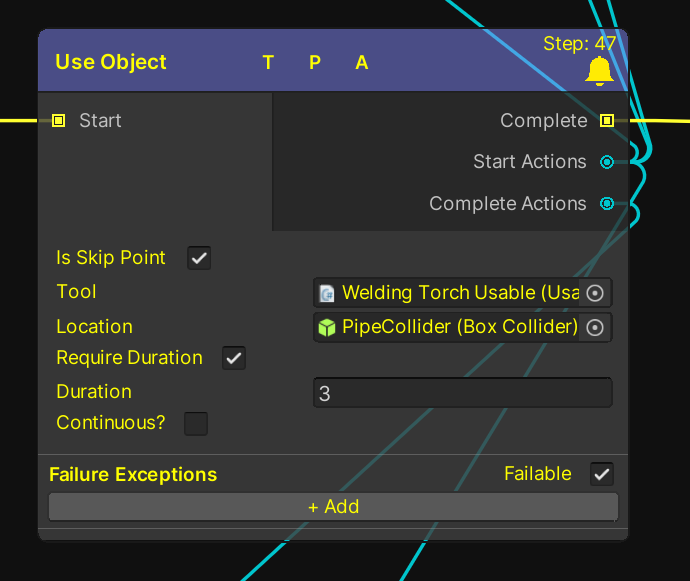
Use Object Step Node in the Graph
For the tool to function as intended, it is essential to make reference to the Usable Middleman, which, in this instance, is positioned on the Welding Torch Usable GameObject.
You also need to include a reference to the collider you want the tool to act on, labelled here as “Location”
As an additional feature, you can determine a necessary duration for the 'Usable' to remain active. The time specified here should match the time set in Power Tool Timer script, if one is used.